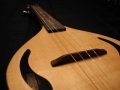
The Top
Planing
I planed the top thinner on this mandolin, although it could possible go even thinner than I made it. It is about 3/32 thick currently and seriously pushing the abilities of the planer I was using. A thickness sander would allow for more control, a smoother cut (as opposed to the nasty tearout the planer creates) and a thinner top if you so desire. The other route I may try with my next mandolin is to have the jointing and planning of the top done by whoever I buy the wood from. The price seems to be reasonable at around $15 considering the better results the pros will be able to get with the right tools.
Sound Holes
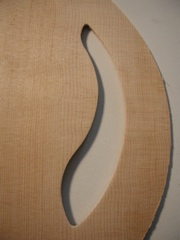 I used a paper template to locate and I cut out the sound holes. I started by drilling a hole, removing the majority of the material with a coping saw, then finishing with a wood rasp and needle files. These soundholes wound up being much closer to the edge than on the last mandolin. It took a lot more care and time to cut out the holes without breaking the top. Unfortunately, I was going too fast with the coping saw at one point and split the top on the grain above and below the sound hole. (I didnt take a picture since I wasnt planning at the time to ever speak of the incident again.) I had to glue the piece back on with wood glue, which luckily worked very well. Its impossible to see the break now. Still, Id recommend patience over unnecessary repairs.
Braces

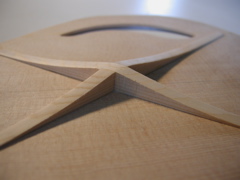
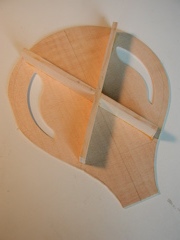 The braces were first cut out of a larger piece of spruce sold to be used in guitars. I notched the two braces together in the x pattern then glued them onto the top with wood glue. I used a flat board to clamp the top and braces flat while they glued.
Carving the Braces
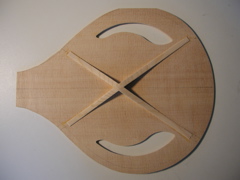
I was aiming for a less harsh sounding instrument than my last mandolin. My hypothesis was that carving the braces lower would favor the higher frequencies less and lead to a richer sounding instrument. I kept going back to take more off of the braces incrementally over the course of a day or two as I pushed them ever smaller. I used a thumb plane to do the majority of the carving of the braces. The final height ended up being about 3/8ths of an inch at the center to essentially nothing at the tips. I didnt try to scallop the braces at all this time since my attempts on the last mandolin didnt work out.
Other Considerations
To further enhance the bass response of the instrument, I tried to make the braces thicker on the bass side. I dont know if that helped or not since I couldnt compare directly to another mandolin with the same pattern. This mandolin does sound better than my first mandolin which had taller braces, but that is a very different pattern, so its tough to tell what was most responsible for the positive change in the instruments.