Setup
Peg-head and Tail Pins
None of the pins are held in with glue, rather they only rely on the string tension to hold them in place. Besides one e string acting strangely then eventually unwinding at its loop end (the strings fault as far as I can tell since this hasnt happened to any other strings on any other mandolins using pins to secure the loop end of the strings), the pins have worked without incident.
The peg head pins are long enough for the strings to break over the nut and run parallel to the top of the peg head. An indent was filed into the pin using needle files to hold the looped end of the string in place. The indent is about a quarter to a third the diameter of the pin and was filed to ensure a smooth edge for the strings so they wouldnt inadvertently be cut.
The other set of pins at the tail end of the mandolin redirect the strings to the tuners. These allow the strings to break over the bridge with a very slight lateral angle. Without these pins, the bridge would have to use deep groves to keep the strings on the bridge, or the strings would tend to pop off the bridge sideways. These pins are much taller than the other set of pins. They also have an indent filed into their side with a needle file to position the strings.
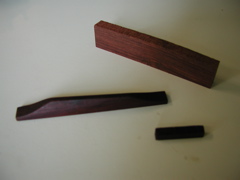
The Bridge
If you have been to the finished page for my first acoustic mandolin, you have seen this mandolins bridge. I switched out the old plain looking maple bridge I first used on my first acoustic mandolin with the new rosewood bridge which I had actually made for this mandolin. The switch was only for aesthetic purposes: I am still using the original maple bridge on my first acoustic mandolin. The bridge pictured on this mandolin is the one it still uses.
The bridge started as a blank band-sawn from rosewood stock. After smoothing the sides of the blank on a sanding table, I marked out the curves of the front profile. I used a microplane rasp and the curved side of a wood rasp to shape this feature. I then marked the top profile, which is slanted between the the g and e string sides for truer intonation. Even with a deal of thought about how to compensate the bridge, I naturally managed to get the top profile backwards. The e string side of the bridge should be closer to the neck and the g string side farther from the neck for proper intonation (as far as I can tell from recent research.) Most f-style mandolins go farther by compensating each individual string, although that wouldnt look as slick with this bridge design.
 To finish the shaping of the bridge, I used the flat side of a wood rasp to blend the sides of the bridge with the top profile. Needle files and sand paper were used for to achieve the final shape and to smooth the surface. Once the bridge was shaped and I had tried it on the mandolin, I found I needed to sand down the bottom of the bridge (I didnt want mess with the finished top profile even though it would have been less material to remove) to get the action to where I wanted it.
The Nut
The nut was also made of rosewood of a simple block shape. I usually fit the nut by getting the overall blank to the approximate size but about a sixteenth of an inch higher than it should be. Once I have marked out the string spacing and cut preliminary grooves, I loosely string up the mandolin. From that point I can see where I need to cut the grooves deeper to get down to the proper action. I work one strings height at a time while the strings are still on the mandolin. I do so by loosening the string, stretching it clear of its groove to the side so it doesnt get cut (while still keeping enough tension that it stays on the mandolin), then cutting the groove a bit deeper. I can then recheck the action of the string by tuning it up to just below pitch. The process is simply a matter of taking off a (very) little at a time and repeating until the action is where you want it. With all the groves to the right depth, I go back and file the top of the nut to the proper height for a finished look.
Installing the Knobs
The knobs are relatively small 3/4 inch Radio Shack knobs which came in a pack of four for about $3. This size not only fits the close proximity of the pots, but also works well with the scale of the instrument. They also look quite nice from the top. Unfortunately, they arent big enough to cover the entire post, so they leave a gap of about an eight of an inch between their bottom and the top of the mandolin.