The Fretboard
The majority of the methods I used to fret this mandolin were the same as described on the set-up page of my first acoustic mandolin. I installed all the frets before attaching the fretboard to the mandolin using the hand hammering method and mostly used the same filing procedures.
Inlaying the Position Markers
For the first time I inlaid simple dot position markers on the top of the fretboard. The pattern is relatively standard with a marker centered behind frets 5, 7, 10 and 15 with two markers equally spaced behind fret 12 to mark the octave. I used relatively small inlays (4mm) compared to most mandolins, but they fit well with the scale and style of the instrument.
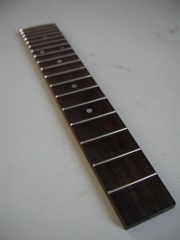 The dots were inlaid by drilling a hole of the appropriate size into the top of the fingerboard using a drill press and brad point drill bit. It was difficult to get the depth right since the small pearl inlays had to just stick up from the top of the board. It took a lot of trial and error using a scrap piece of the fingerboard material to find the proper depth. I glued the inlays in with a small dot of epoxy at the bottom of the hole. Once the glue had dried, I used a sanding block and sanding table to level the pearl inlays with the surface of the fretboard. I started with a relatively coarse grit (I think it was 60 grit) which surprisingly did fine cutting the pearl; I was afraid it would chip. I finished with about 300 grit which left the surface smooth and level. Throughout sanding I was careful not to remove much material from the actual fretboards surface.
Attaching the Fretboard
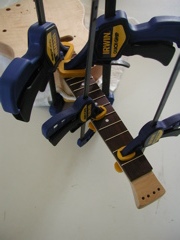 The alignment pins I had already installed (and which are now hidden under the frets) make for easy attachment of the fretboard. I used wood glue to bond the fretboard to the neck. It took four clamps to securely hold the fingerboard while it dried. Once the glue had finished drying, I removed the clamps then smoothed out the transition from the fretboard to the neck with 0000 steel wool.
Leveling the Frets
With the fretboard attached, it was time to level and re-crown the frets. Again, I used the same method as with my first acoustic mandolin. I dont have a proper fret leveling file so I used a sanding block and extra-fine aluminum oxide sand paper. It takes a while and makes a lot of dust but does work. I was worried about creating deep scratches that would be hard to remove if I used a coarser grit. Since I still dont have a fret re-crowning file I just sanded and buffed the frets for a smoother finish.