Routing the Cavities
Drilling for the Tuners and Pots
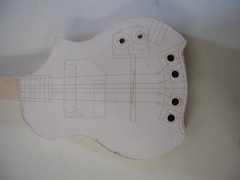 I went ahead and drilled the holes needed for the tuners and potentiometers before routing the cavities to make tear-out a non-issue. I used a drill press and only plunged part way through the body.
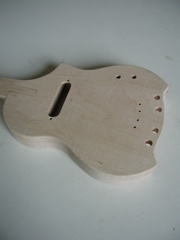
Drilling for the "Peg-head Pins
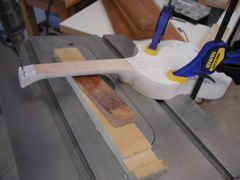 To hold the strings at the nut end, the abbreviated peg-head has four brass pins. The holes which accept these pins were drilled so they didnt exit the other side of the peg-head, although I tried to make the holes as deep as possible to make sure the pins would be stable and secure under tension. The holes were drilled so theyre about 15 degrees from perpendicular to the fretboard. The rather awkward set-up to drill these holes can be seen in the picture. The board under the neck is there to support it from bowing while drilling. More information on the pins can be found in the set-up section.
Routing Set-up
I used a handheld router and ¼ inch spiral bit with a collar on the router base as a guide to cut the cavities and the recess for the tuners. I made templates out of ¼ inch plywood as guides for the router's collar. The templates proved to be smaller and less sturdy than they should have been. They were usable, but could have been much more substantial to allow for easier routing.
Routing the Tuner Recess
 The most difficult of the templates to use was the tuner recess's template. The awkward way it had to be clamped to the body also led to it sliding and cutting farther than I had planned. I was able to fix this by making the tuner recess a bit bigger than originally designed. This turned out to not be a big problem, but it was still frustrating to be forced into revising the design. Next time Ill make a large and sturdy template.
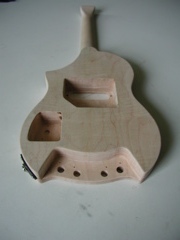
Routing the Cavities
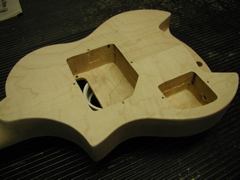 Routing the cavities was relatively easy. The templates were better supported since they are in the middle of the mandolin. I still had to make two passes to reach the full depth (which is all but 1/8th inches of the bodys full depth) due to the amount of material that had to be removed. Some of the routing was rather squirrelly as the bit pulled itself wherever it wanted. The router was most difficult to control while hogging out material in the middle of the cavities, but with enough passes I was able to clear out the material and leave a reasonably smooth surface.
Cutting the Pick-up Opening
 Unlike many electric instruments this mandolin doesnt use the usual cover plate. Instead, the pickup pokes through the wooden top. To make the opening, I drilled a hole on either end of the pick-up opening (this may have been better done before routing to avoid tear-out.) I roughed the opening using a coping saw, then finished and fined tuned the fit to the pick-up using a wood file and needle files.
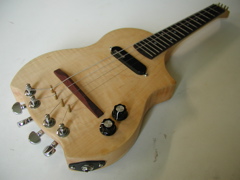
Tuner Installation
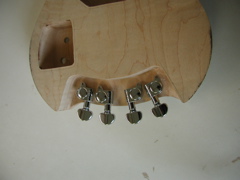 With the routing finished and the cavities sanded, I installed the tuners. I had to play around with the tuners position to make the knobs spacing look right since the tuner holes and the cavity werent quite evenly spaced and symmetrical.
Bridge to Tuner Pins
I drilled holes for another set of four brass pins positioned between the bridge and tuners. These pins guide the strings from the bridge to the tuners without creating such a drastic sideward angle over the bridge. The holes for the pins were drilled to about an inch deep.