Construction Part 3
Skirt
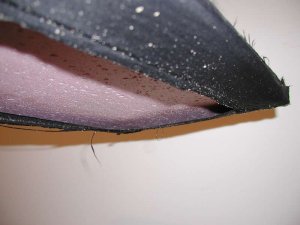 The skirt made of four pieces of fabric sewn together at the edges so the edge that touches the ground is smaller than the edge which fastens to the craft in order to catch air efficiently. The top of the skirt is pined onto the sides of the foam body with regular straight sewing pins. This holds the skirt on well with little air loss, but could be more secure, as pins often come loose and become ineffective. The picture at left was taken after running the craft on a gravel covered parking lot.
This openbottom skirt design is very simple and effective at holding air while creating little friction, but it does have some issues. When running on surfaces with sand and other loose debris, it tends to scoop up said debris and weigh down the rear end of the craft. Running on rough surfaces also tends to wear and fray the skirt. A tube like design with holes on the inner wall would help to solve this problem and would still be easy to attach to the foam, but I havent tried this design yet.
Adjusting the Center of Balance
Hovercrafts seem to be relatively resistant to a mis-positioned center of gravity. It is still important to check that the craft is level while the engine is running. Air running through the lift duct at the rear of the craft and the engines torque can both affect the balance enough to change the way the craft handles. Its a good idea to test the running balance before permanently securing the radio equipment. Since the engine and servos were positioned in relation to the rudder and lift duct fans, the positions of the receiver, batteries and fuel tank were the main variables. I started by positioning the fuel tank as close to the center of the craft as possible so it wouldnt change the center of gravity as the fuel is used. The rest of the RC equipment was positioned to place the center of gravity in the correct place: about an inch towards the tail end of the center of the body to counter the thrust of the lift duct and about 1/4 inch to the left side to counter the torque of the motor. I then tested out the running center of balance by taping everything on for a test run. After a few tries I was ready to route out the cavities for the RC equipment.