Setup and Fretting
I had originally planned on fretting the mandolin after the fingerboard was attached, as is done on a guitar, but realized that would be very difficult considering the mandolins shape. Some of the frets would be very difficult to reach and the board would be difficult to support without damaging the body or finish. It was much easier to just fret the board before it was attached to the body. With some effort, and a couple second tries, I was able to complete my fretting job without all the expensive tools they sell for the task. A simple hammer is all that is really needed, although a heavy duty fret press would make the job easier.
Installing the Frets
 I tried the hammer method first. This quickly resulted in bent frets, including a few which were too warped to seat all the way across. I ended up using the clamps (as shown to the left) in the same way a fret press would be used. This worked fairly well for the first mandolin, but is not ideal.
Installing the Frets...Take 2
 On my most recent mandolin I wound up going back to the hammer method with a better technique which let me seat the frets more consistently. I used the ball peen hammer at left for this purpose, although a hammer of a softer material wouldn't dent the frets. With this hammer, the dents weren't severe enough that the fret leveling process couldn't take them out, so I went with it in lieu of an expensive new purpose built hammer.
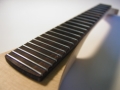
To install the frets, I started with the precut fret wire positioned at an angle to the fret board and gently taped it into place so the fret would catch the corner of the fret slot. From there, I carefully taped across to the unseated side until the entire fret was seated up to the tangs. To seat the frets the rest of the way, I started with strong blows to the two outside edges, working back and forth between the two sides until both sides were seated. This helps to avoid bending a concave curve into the fret wire, which could prevent the edges from seating all the way. From there it is just a matter of seating the center of the fret. The trickiest part of this process is keeping the hammer level to prevent damage to the fingerboard.
If a fret didn't seat all the way across, I removed it with the pair of pliers shown above. The small teeth allow the pliers to grab under the fret, so it can be pulled out. Being careful to not knock the little bits of wood that tear out when a fret was removed, I installed a new fret with the tangs in a different position from where they were on the old fret so the tangs have clean undamaged wood to grab onto. If all else fails, you can always epoxy the frets into place by opening up the slots and glueing in the frets. I think some factory mandolins use this technique, but I haven't tried it yet.
Filing the Frets
 To dress the frets, I filed them individually. I used a large file so that I could work with two frets at a time up higher on the fretboard which helped to protect the edge of the fretboard. On the lower frets, I used tape on the edges of the file to prevent them from plowing through the fretboards edge. To get the angle on the ends of the frets, I clamped the fretboard up on its edge and filed the angle using a block of wood clamped to the table as a guide so all the frets would be consistent.
Gluing on the Fretboard
 Since I was originally going to fret after I attached the fretboard, I couldn't use the alignment pins as I had planned. At first I was going to leave out the two frets where the pins are located. I ended up just cutting the pins short and leaving them in their holes in the neck. I used regular wood glue again to glue on the fretboard.
Leveling the Frets
 After I attached the fretboard, I leveled the frets with fine sand paper attached to a flat block of wood. A purpose built fret leveling file would certainly make this go faster. It took quite a bit of sanding to level the frets. To finish the frets, I re-rounded them with a crowning file and then sanded and buffed them to a shiny finish.
Making the Nut
 The nut is often time consuming. It took me about an hour to make the one shown, and 30 minutes to ruin the first attempt. There is a very thin line between a low action that plays well, and a low action that causes the strings to buzz constently. The only way to ensure a good result is to go slow, be patient and try not to push it too far. I've gotten caught a few times trying to make the action just a little lower, at which point I end up going too low and ruin the nut. Generally I just come prepared to do two nuts before I come up with one that I am happy with.
Tailpiece Pins
 Here is the tailpiece system. The brass pins are made from 1/8th inch round brass rod. I filed a groove into the side to position the strings, making sure not to leave any sharp edges.